
I use a screenplay format (or “audioplay” format, as some would call it) for most of my work with recording dialogue. The screenplay format has an advantage over spreadsheets and other more game-production-centric formats: it is easy for actors to read. This is owing partially to the narrow, uncluttered presentation of dialogue. But also, the screenplay format uses well-established conventions that have changed very little over the course of centuries. In the same way that musicians become familiar with sheet music, actors spend years becoming familiar with the screenplay format. When we are talking about making the best use of studio time and minimizing retakes, particularly with cold reads, I want to use the screenplay format for actors to read their lines.
For games, we sometimes get dialogue meant to be recorded in English, but accompanied by subtitles in other languages. The English text needs to be translated to these other languages. We work with different translators and services that perform this translation. We could just send them the English text in a screenplay format. However, there are disadvantages to using the screenplay format for this purpose:
- It doesn’t have the same familiarity to translation services as it does for actors.
- Action sections, parentheticals, and other non-dialogue text are included in the document and can cause confusion about what should or should not be translated.
- There is no convention in how the translated text should be added to the document (or given in a separate document).
- There are no status-tracking conventions, e.g. is text ready to be translated? has the translation been approved?
- The translated text can’t be programmatically exported into resource files used by a game or other software.
In short, the screenplay format is a poor choice for communication with translation professionals. Most of them will be able to work with it, but the screenplay’s ambiguity and poor mapping of information to the translation task mean that more time will be spent by someone making sense of it at different points in the localization process.
My solution is to use Final Draft’s FDX screenplay format for recording lines with actors, and convert it to the XLIFF format when sending it to translators. I’ll detail the technical steps below for making this happen.
FDX to XLIFF
The first part of this task is performed inside of Final Draft.
- Get the recording script into Final Draft if it didn’t begin there, and clean it up so that all text is specified as the right formatting type, e.g. dialogue, character, parenthetical, etc.
- Fix or ignore any text marked in error by the spell checker. (This affects how text is stored in the FDX file.)
- Add line numbers to dialogue. This is accomplished in Final Draft by:
- Choose “Scene Numbers” menu option from the “Production” menu.
- Select “Number/Renumber” so it is checked.
- Select “Dialogue” from the “Element” dropdown.
- Click “OK”.
- Save the FDX file.
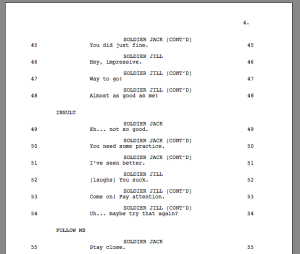
Final Draft can add unique numbers to each line of dialogue.
The script now has line numbers shown to left and right of each line of dialogue (see screenshot to the right). These line numbers will double as unique translation unit IDs that will go into the XLIFF file. The next steps involves using an XML style sheet to use the FDX file as an input and generate an XLIFF file as output. Step 1 below assumes you are using a Mac. If you’re on Windows, Linux, or something else, look for a command-line XSLT processor to run instead of xsltproc.
- From command line, run
xsltproc fdx-to-xliff.xslt input-script.fdx > output.xliff. - Review
output.xlifffor any errors or missing text. (Sorry, no process is so fool-proof and automatic to skip a little manual review.) - Edit
output.xlifffile to settarget-languageattribute to match the language to which the translator will translate. - Make copies of
output.xlifffor each target language, and change thetarget-languageattribute to match.
Then I send the XLIFF files to the translator. After the translator finishes work, the XLIFF files come back to me with the target elements containing translated text.
Here are the contents of the XSLT file referenced in step 1 above:
<?xml version="1.0"?>
<xsl:stylesheet xmlns:xsl="http://www.w3.org/1999/XSL/Transform" version="1.0">
<xsl:output method="xml" indent="yes"/>
<xsl:template match="/">
<xliff version='1.2'
 xmlns='urn:oasis:names:tc:xliff:document:1.2'>
 <file source-language='en-us' target-language='es-es' datatype='plaintext'>
 <body>
 <xsl:for-each select="FinalDraft/Content/Paragraph[@Type='Dialogue']">
 <xsl:if test="Text != ''">
 <trans-unit>
 <xsl:attribute name="id">
 <xsl:value-of select="@Number" />
 </xsl:attribute>
 <source><xsl:value-of select="Text" /></source>
 <target></target>
 </trans-unit>
 </xsl:if>
 </xsl:for-each>

 </body>
 </file>
</xliff>
</xsl:template>
</xsl:stylesheet>
Here’s an excerpt of one dialogue paragraph from an FDX file, so you can see what the input looks like:
<Paragraph Type="Character">
 <Text>Soldier Jack (CONT’D)</Text>
 </Paragraph>
 <Paragraph Number="45" Type="Dialogue">
 <Text>You did just fine.</Text>
 </Paragraph>
In the XLIFF file, the dialogue paragraph above gets converted to this:
<trans-unit id="45">
  <source>You did just fine.</source>
  <target/>
</trans-unit>
There is a way to get the word count of the source text to be included in the XLIFF file. (Useful for knowing how much the translation will cost.) But I am still fiddling with the XSLT syntax to make it work. Maybe a topic for another article.
-Erik Hermansen